Anyone interested in textile arts and crafts is going to enjoy these from My Modern Net

Anyone interested in textile arts and crafts is going to enjoy these from My Modern Net

Some of the world’s largest ships are those which lift other ships, rigs and cargo, the largest of these is the Thailf, a Norwegian monster used to build and dismantle oil rigs. Working on the rather smaller scale of 20 or so centimeters I have made a model kit Crane Ship which will soon be sale at Miller Toys and Models. My kits should be challenging for a six or seven year old – they might need a little help – have great play value and provide a sense of achievement when complete. Using 3mm laser grade birch ply means that the models can be robust enough to stand up to repeated play.
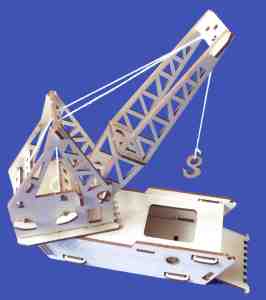
The simple mechanisms help demonstrate how mechanical systems work and provide pleasurable toys. The kit is supplied with a grab bucket (not shown) as well as a hook. All my kits may be painted with acrylic paints, not supplied but widely available.
I’m still looking for varities of ships and boats to make into model kits. The dredger seemed interesting so I started with a basic hull, a shape I’ve now used many times and then added the dredger structure. The rotation was simply and the winch I’ve used before seemed to work but getting the bucket and the bucket arm to stay in place proved more difficult.

Above all I want the kit to be easy to assemble for a six year old and so any mechanism has to be as simple as possible. The kit also needs to fit onto four A5 sheets of 3mm plywood. Play value is also essential, my young testers check out this and other aspects of the design, especially it’s durability!
After some false starts I have used a living hinge and a cog arrangement on the bucket arm to rotate the bucket. The arm itself is also rotated with a similar cog winch but is held by a gravity pawl, giving just enough resistance.
This model will soon be available from Miller Toys and Models for just £18, 42 parts of press-out 3mm plywood, pva glue and string included.
This construction toy is the largest I currently make and the only one I design and make that isn’t entirely 3mm plywood, in this case the sides are 1.5mm thick.

High grade birch plywood gets more expensive as it gets thinner, a reflection of the manufacturing costs and the much smaller demand. This model has a working winch/anchor and is supplied with pva glue although this is not essential. I try to design models which are a good introduction to model-making and have some play value. All the models can be painted, acrylic is best and available from many low-cost shops.
Suitable for girls and boys over 3 years. On sale at Miller Toys and Models. There are 10 models to choose from and as the Corvid lockdown eases I’m hoping to add at least six more, manufacturing is not possible at the moment.
Some time ago I designed a shadow theatre and then laser cut a couple of them. But the design meant that there was a lot of waste plywood after the cut, and more problematically the dismantled theatre was bulky and not postal friendly. So I didn’t try selling it, other projects took precedence.
Recently someone contacted CATO Press, where I’m a member to say she was interested in shadow theatre, so I thought I would dust off the old design and try again.
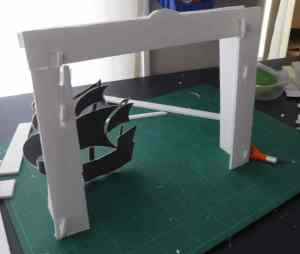
To have some impact and to accommodate puppets a shadow theatre needs to be quite large, my first attempt was rather small. This time I started with the central idea that the structure would be fully demountable and would flat-pack to 700mm x 200mm or less with a pack thickness of less than 50mm. I would include a cloth screen and if possible a lamp of some sort, LED lamps make this a practical proposition, even a torch with a wide angle beam should work.
With the Corvid 19 lockdown on-going it is not possible to make laser cut prototypes, so I’ve made one in 5mm construction board, ½ size. The final version would be 3mm plywood. The slot-together pieces are not all shown, no screen and no decoration. Screen would attach by velcro, scenery to hang from cross-bars which slot into the tops of the wings, for quick change.
In the distant past I made quite large shadow theatres decorated with dragons etc. from construction board, but of course they don’t have a long life, unless treated very carefully. I used these working with adults with learning difficulties (a privilage) and had plenty of fun. It was often surprising to see who could project themselves into the puppets, and who struggled.
Puppets can be bought and one or two sites provided designs for free, Adventures In A Box is one, and these may be cut by hand, or with a vinyl cutter or stencil cutter. Making the sort of fabulous designs seen in traditional Indonesian shadow theatre is certain to demand time and skill, but far simpler things can be quite effective.
Almost finished the owl doll, her costume is mainly silk embellished from scraps. The embellishing machine is great for using up even the tiniest of remnants and bits of thread. Embellishing needles get used up (broken) fairly quickly so I always keep a stock. Just a few final touches needed, her limbs and neck and around her face need to be darker .
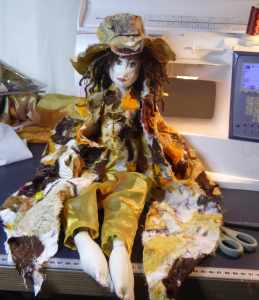
I’m making another in a series of bird inspired dolls, this one is vaguely based on the Tawny Owl. Button jointed dolls are fairly easy to make, I always follow the pattern and instructions of Jan Horrox, a wonderful and inspiring doll maker, then modify things according to my wish. The most challenging part is to put a face onto the head.

These dolls have needle sculpted faces, which takes some practice, then the features are drawn on with Micron pens and water-based coloured pencils. A steady hand is essential and the results can’t be guaranteed.
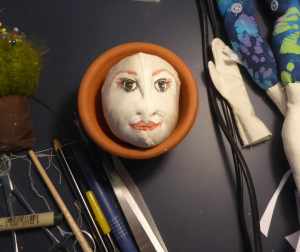
Once the face is drawn then it has to be sprayed with artist’s fix, the solvent type. These dolls are more ornamental than play, although I try to make them robust enough for older children. Next stage is to attach the head, then make hair, or in this case feathers of some sort.

It’s not unusual for me to take the scissors to a fabric work in progress but I rarely hack away half in one go. But sometimes it just has to be done. Anyone who has ever made anything knows the feeling – it’s just not working – but a frequent sin is to fall in love with ones own work, or perhaps just not be able to see where it’s going wrong. I suppose that’s what editors are for.


Another addition to the fleet, soon to be on sale with the rest at Basically Wooden – MixPly.
